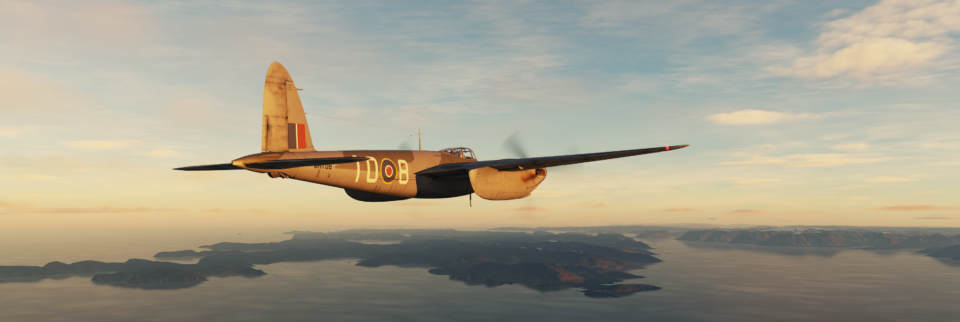
The insights presented on this page here are my summaries and takeways from a couple of videos the Grim Reapers did (see below) on the dead-reckoning method, how it was and is taught in the RAF. This should be insightful to anyone applying this method of navigation in flight simulation, too. The first part (first video) is covering the basics while the second is all about meeting time marks during your mission (TOT - Time on Target). The third part (video) applies these methods to a mission flown in DCS.
The main mindset behind this method is to make it as precise as needed to arrive close enough to the target to see it and as simple as possible without resulting in too large margins of error.
The Basics
Headings: In flight planning in the briefing room on the maps (aeronautical charts) the headings are measured in true headings and then converted to magnetic headings before the flight. During the flight all headings are magnetic headings to avoid confusion and mistakes. Use only integer numbers, not decimals, e.g. 4° instead of 3.7°. All headings are planned for still air (no wind) and corrected for wind drift during flight (see HAT Check below). This has main advantages over planning it with wind correction baked in from the start: 1. the mission can be pre-planned weeks before and the most current wind and weather information can be used ad-hoc just before the flight, 2. any wind change or update can be incorporated ad-hoc during the mission as well.
In a similar fashion as the flight headings all wind directions are true directions in written weather briefings and magnetic directions if heard over the radio. Meteorological wind direction is where the wind is coming from.
Speeds: It is recommended to fly at speeds (true airspeed that is) that are multiples of 60 because that makes mental calculations easier. Flying at, say 180 kts immediately gives you information like that it takes you 1 min to cover 3 nm. Plan your flight so you know the indicated airspeed (IAS, read on the gauge) to fly in order to fly the 180 kts. true airspeed (TAS). Near the ground IAS = TAS.
As the headings, all speeds are planned for still air (no wind) as true airspeed and corrected for wind effects (acceleration from tail wind or deceleration from head wind) during flight (see HAT Check below).
It is advisable to select target points (waypoints) that are easily identifiable from the cockpit from 6-7nm or ~2 min before flying over it.
Magnetic Variation: This is the difference between true and magnetic directions to be considered in flight planning (details on this page).
Here is the video explaining and showcasing all this in planning and during the flight. The flight itself starts around 33:00 min mark:
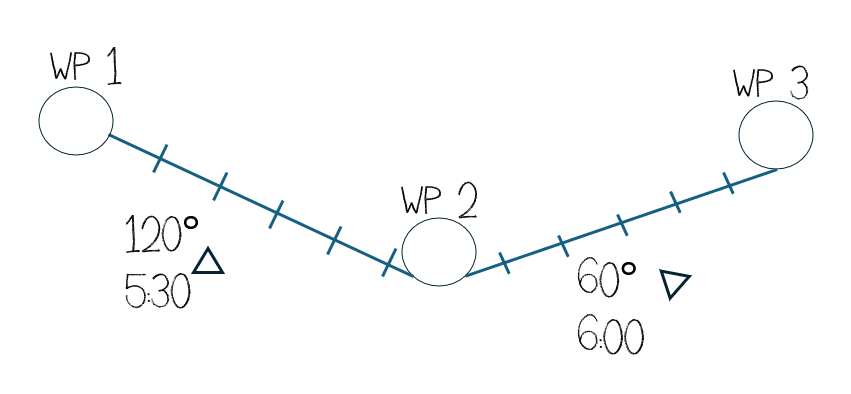
Waypoints and Legs: Any landmark that is easily recognizable from a distance (up to 20 nm) by its vertical extent (if flying low, e.g. chimney, antenna) or horizontal extent (if flying high, e.g. railway lines, coastlines, rivers). Allow for and maybe draw circles of 2 nm diameter around each waypoint to mark the turn radius at the waypoints (1 nm turn radius at 200 kts speed at 45° bank angle is common for warbirds en route). Add time needed for the turns to the flight leg (in the example here: ~15s for a 90° turn).
Keep leg lengths between 5-10 nm to minimize accumulation of errors. Mark magnetic heading and time to next waypoint next to the leg line. Place minute marks on the flight legs. Round time to the next ten seconds, e.g. 5:32 min to 5:30.
Pre-HAT-Check: when approaching the next waypoint, do this in preparation for the next flight leg:
H - heading, apply drift, calibrate compass. Note the next heading from the flight plan.
Mentally calculate the wind drift by firstly calculating the max wind drift (MWD) on the next flight leg. MWD = wind speed (kts) divided by airspeed in nm/min. At wind speed = 18 kts in our example, MWD = 18 / 3 = 6° If the wind is blowing from right onto the aircraft, we drift off course to the left at a 6° angle and need to correct the heading into the wind by this 6°. Flying from WP1 to WP2 in our example, the magnetic heading to fly would be not 120° but 126° in order to fly straight to WP2.
If you use a gyro compass which is subject to compass-progression error, do calibrate (synchronize) it to the magnetic compass before the next waypoint. At the beginning of the flight, first take off and bring the engine rpm up to cruise setting, only then calibrate the directional gyro to the magnetic compass (explanation is in video 2 at 22:50 minute mark).
To get actual wind correction for any wind angle, use the Clock Face method. Wind angle is the angle between the longitudinal direction of the flight path (heading or reciprocal) and the the direction where the wind is coming from. It is always between 0° and 90°.
- For small wind angles, less than 60°: Assume the the wind angle to equal minutes and convert to hours, giving wind drift, e.g. wind angle of 30° would be 30 min, equaling half an hour or half wind drift: 0.5 x 6° max wind drift = 3° wind correction.
The clock-face method is just this conversion from minutes to hour: 20° is 20 min, which is 1/3 of the hour on the clock face, so actual wind drift is 1/3 of 6° in our case, 2°. - For large wind angles above 60° calculate with max wind drift. In our example, wind angle is 90°, so we apply all 6° into the wind to correct for wind drift.
This method is actually a mental approximation of the sinus function of the wind angle to convert max wind drift to actual wind drift (sin 30 = 0.5).
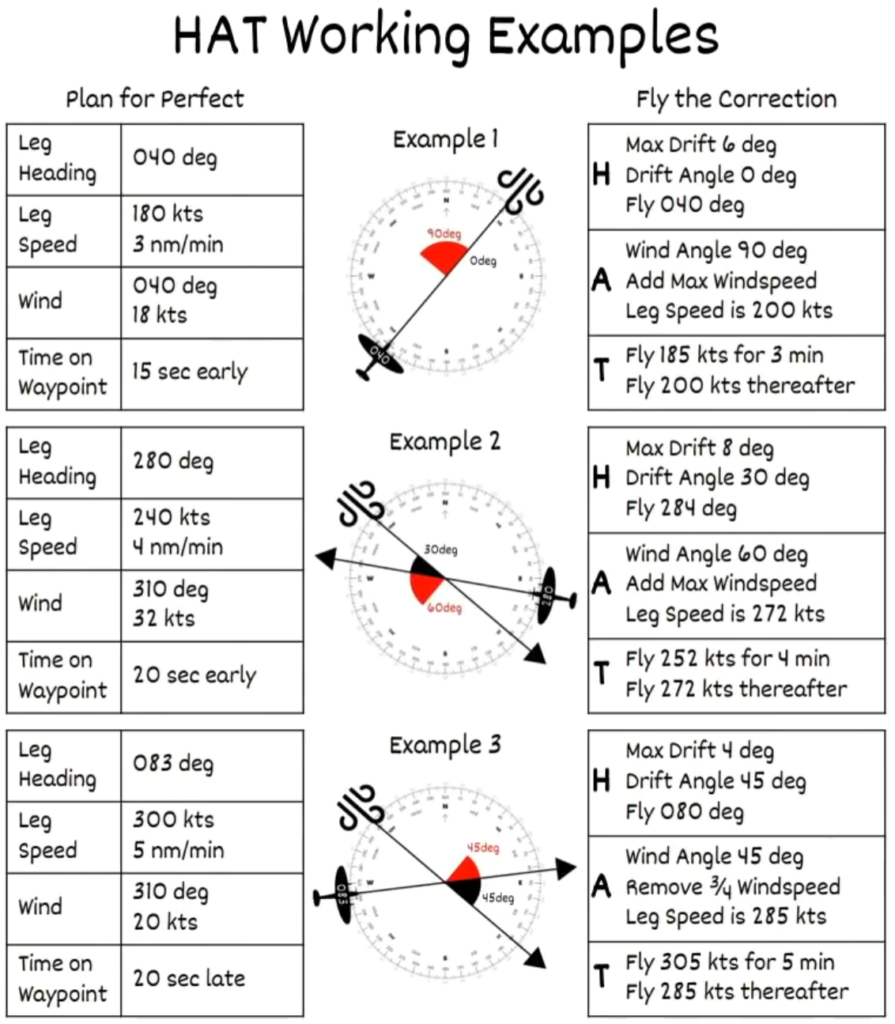
A - apply airspeed correction. Use the same clock-face method to approximate the effect the wind has on the wind speed, but note that for airspeed correction the wind angle is measured from abeam (left or right) of the aircraft.
If wind angle is less then 30° from abeam, assume no effect of wind on airspeed. Because it is coming from the side, the speed of the aircraft is not affected. For higher angles around 45°, assume wind effect on speed is 1/4 of the wind speed and nearing 60° wind affects airspeed only by 50% of its strength. Between 60°-90° wind angle, the effect on speed is maximum, add or subtract 100% of wind speed to the airspeed, depending on whether it is tail or head wind.
T - time on leg to next waypoint. Choose intermediate visual landmark for en-route confirmation of correct heading
Turn on Time: When flying the mission make sure to restart the stop watch at the beginning of each flight leg and fly each leg by itself, e.g. for 5:30 min if the flight plan says so. If the waypoint is not visual at this point - do turn onto the next heading nevertheless! Most probable cause is that you just did not see it but it was there. You can try again at the next waypoint to get visual confirmation.
The rules are:
- If you see the waypoint but are not on a heading to it, then fly directly to it visually!
- If in doubt or don't see the waypoint, then turn onto next heading on the planned time!
Post-HAT Check after passing a waypoint:
- Check...compass and directional gyro match, if not, synchronize.
- Check...IAS correct
- Check...stopwatch running
- Memorize...time to intermediate waypoint
- Put map down and Check Six!
Some suggestions for problem solving enroute:
- Think flight legs and sections in minutes, not miles
- Use environmental cues to correct wind information, etc. smoke directions and shap from chimneys and ships
- Divide airspeed by 60 to get time needed to fly 1 nautical mile
- If you can see the waypoint, fly to it visually
- If you cannot see the waypoint, fly according to the plan and turn on planned time
- Don't be over-precise, 1-2 knots faster or slower or 1-2° off course are no problem
TOT - Getting there on time
In the second video on this topic, the authors applied the lessons learned from the first lesson (video above) to a bombing mission hitting a bridge. So in addition to the navigation part, which is basically identical, an initial point (IP) is added to the flight plan, from where the bombing run starts and the timestamps are running through all waypoints without being reset at each waypoint, note minute marks increasing through all waypoints. Timepieces (watches) are synchronized to ZULU time, usually to allow coordination with other participants in the mission.
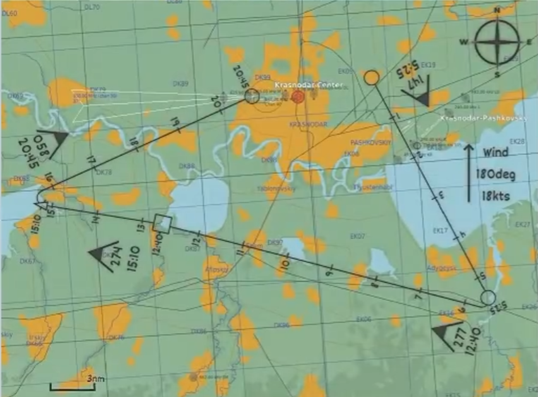
Time on Target - TOT - is the time when the bombs hit the target, accounting for flight time of the bombs in the air. The waypoints are marked by circles, the IP is marked with a square, and the target with a triangle. Do not write inside these symbols, in order to keep the landscape features underneath visible.
Time Correction: When you are arriving late at a waypoint, say 10 seconds late, you calculate how to adjust airspeed to make up these 10 seconds in the flight plan. The calculation here is: Take the amount of seconds you are late in the plan (10 sec) and add this number in knots (10 knots) to the airspeed for 3 min. So, in order to make up the 10 seconds, I add 10 knots to my airspeed for 3 minutes to get me back on time in the flight plan (or half this added speed for double the time: fly 5 knots faster for 6 min).
When passing the next waypoint or minute mark, check whether you are on time now or need to make another correction.
Example from the video below: He was 10 sec late at mark 10 (peninsula) and to catch up, he increased the speed by 10 knots for 3 min (initial point at 12:40 mark).
And here is the video: Briefing first, flight starts at 21:00 minute mark:
Mental Dead Reckoning
In this mission, the lessons from videos 1 and 2 above are applied to a mission flying a jet in this RAF dead-reckoning method.
- How to apply the HAT Checks at the waypoints
- What to do if you do not see the waypoint when expected as per flight plan - Turn on time!
The error introduced by turning without eyes on waypoint is most often MUCH less than the error introduced by passing a waypoint and turning onto new heading (off course now!) too late. - How to select landmarks as waypoints.
- Importance of being on correct heading rather than on correct speed.
- Trust the stopwatch.
Difference between being off speed vs. off heading. It is more important to fly near the correct heading than being on speed.
